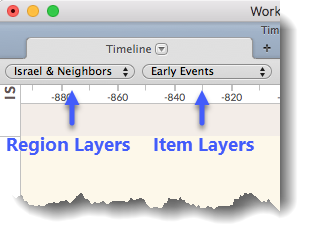
Item Layers
The Item Layers control display of names and events on the Timeline. Each Item Layer displays the selected items with markers and labels defined for that layer.
Items displayed on Item Layers are divided into five categories or classes: Rulers, Prophets, Individuals, Religious Leaders, Writings, and Events. Each class has a distinctive marker to indicate the length of time associated with that items, such as the reign of a ruler, or the life of a person. The color shading at the ends of the markers indicates the range of uncertainty of the begin and end dates.
You can define your own Item Layers via the Define Item Layer dialog box. You can define your own items, the class they are assigned to, and the markers for each class, as well as the style applied to labels on an Item Layer.
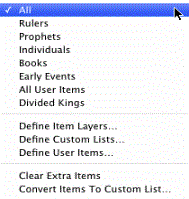
The Item Layers Pop-Up MenuThe Item Layers Pop-Up Menu

 To select a different Item Layer, simply choose it from the Item Layers pop-up menu.
The Item Layer pop-up menu is divided into three sections:
-
The top section lists pre-defined Item Layers.
Selecting a layer displays its items on the current Timeline. If no items are visible in the Timeline tab, the scrolls to display the closest items.
- The middle section is used to customize the Item Layers.
- Define Item Layers: Use to modify a current layer or create a new one, using the standard list of items and selecting the items to be displayed by their class and date range.
- Define Custom Lists: Use to create lists of individual items that can then be displayed on an Item Layer. You can choose items from the list supplied with the Timeline, or from the user items you have created.
- Define User Items Use to create your own items with names or dates that differ from those already supplied. In order to view these items on the Timeline, they must first be added to a Custom List. That Custom List must then be applied to an Item Layer which can be displayed on the Timeline.
- The bottom section is dimmed until you display (highlight with the extra item style) individual items using the Find button, by manually highlighting an item, or by amplifying to the Timeline from a Text or Tool.
- Clear Extra Items removes highlighted items.
- Convert Items to Custom List removes the highlight from all items and opens the Define Custom Lists dialog box with these extra items included in a new Custom List.
Define/Edit an Item LayerDefine/Edit an Item Layer
You can create a new Item Layer, edit an existing Item Layer, or create a copy of an existing Item Layer and modify it.
|
Note If you want to have specific names or events appears on the Item Layer, or add items not included in the Timeline database, be sure to define your Custom Lists and User Items first, then follow this procedure. |
-
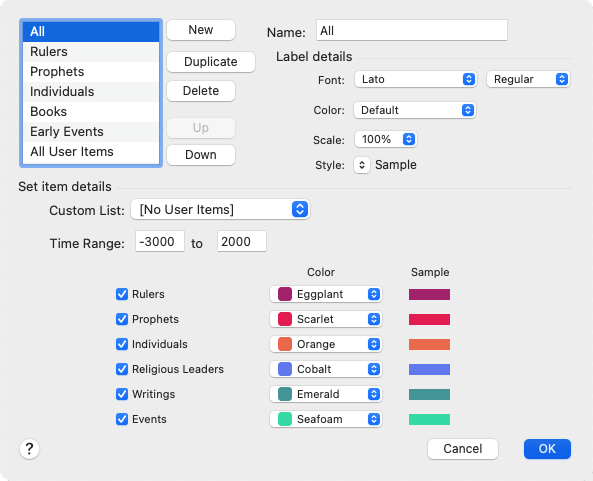
On the Item Layer pop-up menu choose Define Item Layers. The Define Item Layers dialog box appears.
- In the Define Item Layers dialog box, do one of the following:
- To create a new Item Layer, click New. [New name] is added to the list on the left and appears in the Name box.
- To edit an existing Item Layer, select it from the left panel. The layer's name is displayed in the Name box.
- To make a copy of a Item Layer and modify the copy:
- Select the desired layer in the left panel.
- Click Duplicate. The original layer name, followed by a number appears in the list and in the Name box.
-
If desired, enter a new name for the duplicate layer. The change is immediately applied.

Hint
If you do not see the new name in the list, refresh the display by clicking the Up or Down button.
- In the Define Item Layers dialog box, define the appearance of the layer as follows:
- Define the appearance of text labels using the standard Font, Color, Scale, and Style pop-up menus.
-
Choose a Custom List from the Custom List pop-up menu.

Hint
Choose All User Items to quickly display all user items you created with all the political periods.
- Enter the Time Range that applies to this Item Layer in the Time Range boxes.
- Define the classes that should be displayed on this Item Layer, and their appearance.
- When done, click OK.

