The Research Tab
The Research tab is used to perform advanced searches (or research) on words, phrases, and search arguments in multiple modules![]() Any Bible text, or other single tool that can be read in Accordance, including reference texts and articles; may also be referred to as content or resource. Your search results are displayed in an easy to navigate manner. You can review all results, display more information about a hit, scan hits from multiple modules, and open a specific Text or Tool for further reading—all in one place.
Any Bible text, or other single tool that can be read in Accordance, including reference texts and articles; may also be referred to as content or resource. Your search results are displayed in an easy to navigate manner. You can review all results, display more information about a hit, scan hits from multiple modules, and open a specific Text or Tool for further reading—all in one place.
The Research Tab has two major areas, the Research Entry area and the Research Results area with a Table of Contents, and Results pane.
To open the Research tab, do one of the following:
- On the File menu choose New>Research. The Research tab opens in a new zone, with the search set to [All].
- Enter a search argument in the Research box on the Workspace toolbar and Press Enter. A Research tab opens displaying the search results.
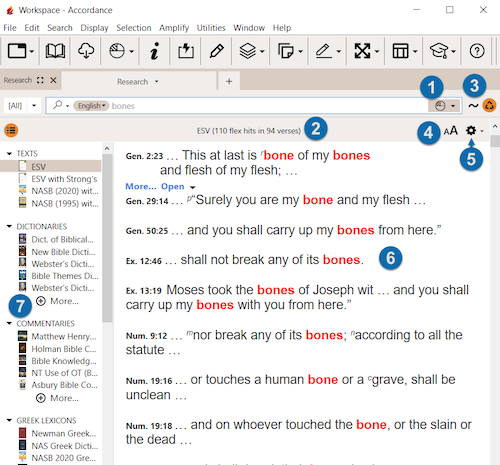
This picture shows the search results for a simple search argument (Exact type) performed on a User Group with various Text and Tool modules. Details on the Research tab are given beneath the picture.
The Research Search Entry AreaThe Research Search Entry Area
This area includes a Search Entry box (4) and the Field (3) and Search Group (1) pop-up menus.

| # | Item | Used To... | Notes |
|---|---|---|---|
| 1 | Research Groups pop-up menu | Select the group(s) to be searched |
Lists all major module You can select more than one group to search using Shift+Click |
| 2 | Research Options pop-up menu | Review or select a previous search, and to choose a Literal or Grammatical search in Hebrew Texts and Tools. | 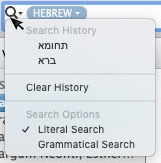 |
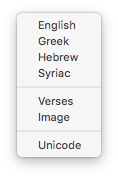
| 3 | Research Type pop-up menu |
Define the type of content you want more information about; available items are:
|
 |
| 4 | Search Entry box |
Enter the search argument The divider bar below the box can be pulled down to make the Search Entry box higher |
You can use the same search criteria as in a Search tab |
| 5 | Exact/Flex Search button | Used to select a Flex or Exact Word search. When choosing a Flex ( |
The default setting is located in the Reading/Research area of the Preferences dialog box. |
| 6 | Recycle button | Make the tab recyclable |
The Research Results AreaThe Research Results Area
The Research results are displayed and navigated using a Table of Contents and a Results pane.
| # | Item | Used To... | Notes |
|---|---|---|---|
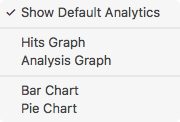
| 1 | View Analytics Button |
Displays an analysis of a Word search in Text modules. The following analytics options are available:
|
 |
| 2 | Research Pane Bar | View the name of the top module in the Results pane and the number of Exact or Flex hits as well as the number of verses in that resource |
|
| 3 | Flex/Exact Search button | Used to select a Flex or Exact Word search. When choosing a Flex ( |
|
| 4 | Font Size Button | Increases or decreases font size in the Results pane | |
| 5 | Action Pop-up Menu |
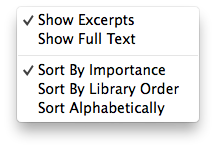
Determines how results are displayed in the Results pane, and the order in which hits are displayed (in the browser and the pane), as follows:
|
 |
| 6 | Results Pane | Displays the entire search results; the resource selected in the Table of Contents (highlighted in blue) is displayed at the top of the pane | You can scroll through the list, view more information about an item, open the item in a new tab, view links in the Instant Details, and select and print any of the displayed results or use the Copy As item (Edit menu or shortcut menu |
| 7 | Table of Contents | Navigate between all hits resulting from the search | Click the small triangles to hide/show hits in a particular category |
More about the Table of Contents
- The top five modules for each category/group are displayed with their book cover and sorted based on your selection in the Action pop-up menu.
- Click More to view more hits in the browser, for a category of resources.
- For Tools, the name of the field with hits is displayed after the module name.
- When the results are first displayed, the line of the first module is highlighted.
- Click a title to open that module in a new tab and navigate through the hits.
- Texts will often have a different number of hits; you can then compare the hits between two or more texts, or note when a text does not have that word at all and is not listed.
- Use the Reading/Research area of the Preferences dialog box to change defaults relating to how a Research search is performed and the results displayed.
More about the Results Pane
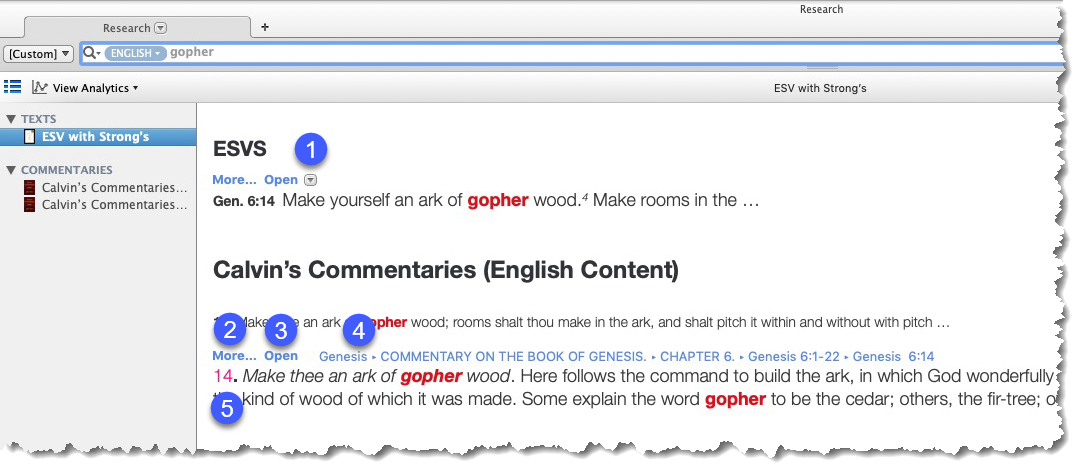
Referring to the picture below:
- The name of the module appears in bold above each set of results.
- The term/phrase being researched is highlighted as a hit in the Results pane.
- Click the Amplify
 To select words or a reference and search for the selection in the text or tool of your choice. You can select the resource in the Library or Amplify menus. A triple-click is a shortcut which amplifies to the top tool of the relevant category. button (1) to search a user-created workspace. When amplifying from a hit in a Text tool, the option to amplify
 To select words or a reference and search for the selection in the text or tool of your choice. You can select the resource in the Library or Amplify menus. A triple-click is a shortcut which amplifies to the top tool of the relevant category. to the Text Browser is included in the drop-down list.
 - When hovering over a specific entry, and depending on your selection in the Action menu and the Reading/Research area of the Preferences dialog box, the results also include a More command (2) for showing a larger excerpt in the Results browser. After clicking More, the command changes to Less.
- Each hit is accompanied by an Open command (3) and a path (4) for quickly viewing exactly where in the resource the relevant content is located. Click Open or on the path to open the resource in a new zone or tab.
- Texts results are opened in the Text Browser or Workspace by clicking on the selector button (
 ).
). -
Mouse over Scripture links (5) and cross-references to view them in the Instant Details. Click on the links to open in a new tab.
- Click on pictures displayed here to open them in a new Pictures zone.
- The display settings are the same as those for the first Text and Tool module found in the search.
- You can copy or print the content in this pane via the Research shortcut menu. Available options are Copy, Print, and Print Selection.
Open a Module via the Research TabOpen a Module via the Research Tab
You can open any module listed in the Table of Contents. The module opens in the appropriate tab or zone.
- Double-click a resource in the Table of Contents. The module opens in the appropriate tab or zone with the hits highlighted and bookmarked for ease of navigation.
- Mouse over an item in the Results pane to reveal the hit navigation links. Click Open or the resource path. The module opens in the appropriate tab or zone with the hits highlighted, bookmarked, and scrolled to the selected hit.
- If opening a dictionary, if the hit was in the Entry or Title field, the display scrolls to the most relevant result.
