Define Highlight Styles Dialog Box
Prerequisites for use: None; this dialog box can be opened at any time.
Use: The Define Highlight Styles dialog box is used to define Highlight files and associated highlight styles which you can apply to Bible text using the Highlight popover.
Description: The dialog box has two main areas. The top area lists current defined highlight files and styles. The bottom area is used to define or edit specific highlight styles.
Open the Define Highlight Styles Dialog BoxOpen the Define Highlight Styles Dialog Box
Do one of the following:
- On the menu bar, choose Window>Highlights>Define Highlight Styles.
- On the Highlight palette, choose Define Highlight Style from the Highlight pop-up menu.
Define Highlight Styles (Overview)Define Highlight Styles (Overview)
- Open the Define Highlight Styles dialog box.
- Do one of the following:
- To create a new Highlight file, from the Highlight File pop-up menu, choose New Highlight File.
- To edit or add styles in a Highlight file, choose the desired file from the Highlight File pop-up menu. Already defined styles in the file are displayed in the list of Highlight styles.
- Click New to add a new style to the Highlight file. The words [New style name] appear in the Name box.
- In the Name box, enter a name for the new Highlight style.
- Choose the Color, Intensity, Shape, and Pattern for the highlight via the respective pop-up menus. You can preview the style on the Sample Text.
Options in the Define Highlight Styles Dialog BoxOptions in the Define Highlight Styles Dialog Box
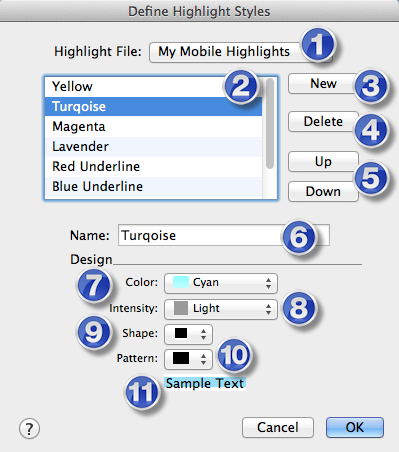
Highlight File pop-up menu: Used to select, edit, or create a highlight file. If you choose New Highlight File, a box appears for naming the highlight file.
Highlight Styles List: Displays available Highlight styles in the selected Highlight file. The style last edited is selected in the list and its name is displayed in the Name box.
List Buttons: Used to arrange the names in the list and on the Highlight popover.
- New: Adds "New style name" to the list and in the Name box.
- Delete: Removes the selected style from the list and from the Highlight popover.
- Up and Down Buttons: Click to move the selected style up or down the list.
Name Box: Used to enter or modify the name of the Highlight style. Adding spaces before the name indents it on the pop-up menu.
Design Area: Items in this area are used to define the Highlight Style.
- Color Pop-up Menu: Used to select a color from a standard range, or for creating a custom color. A separate custom color can be saved for each style.
- Intensity Pop-up Menu: Used to select a range of color intensities. Available options are: Very Light, Light, Medium, or Normal.
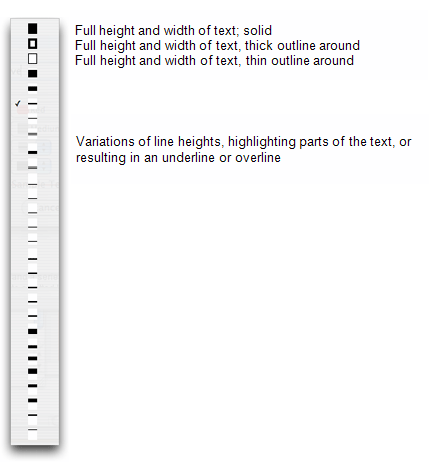
- Shape Pop-up Menu: Used to select the shape of the highlight drawn through the text. You can select a shape and see how it will appear on the text by looking at the Sample Text. Click the picture below for more details.
- Pattern Pop-up Menu: Used to choose from a solid line and a series of horizontal patterns. When applied to a thin line the patterns create a dotted line. With a thick line is chosen they appear as stripes.


