The AGREE Connecting Item
The AGREE connecting item for tagged texts specifies that certain grammatical details of two elements must match. This item can also be used together with NOT to specify details which must not match.
When the AGREE connecting item is dragged into the Connection area above the elements to be constrained, the Select Agreement Details dialog box for tagged texts opens. From there, you can specify the type of agreement between the two elements. Available options vary, depending on whether you are working in Greek or Hebrew.
- The two elements connected by the arcs of the AGREE item must agree for every grammatical detail selected in the dialog box. When you close the dialog box, the selected details appear as text within the AGREE item.
- Double-click on the AGREE item to reopen the Select Agreement Details dialog box and review or change the settings.
View the Select Agreement Details Dialog Box for Greek and Hebrew TextsView the Select Agreement Details Dialog Box for Greek and Hebrew Texts
| For Greek Text | For Hebrew Text |
|---|---|
 |
 |
Using NOT with AGREEUsing NOT with AGREE
The NOT item can be used with the AGREE item to specify the details in which the connected elements cannot agree.
- To negate the details specified in an item, place the NOT item over the AGREE item.
- If there is more than one detail in the item, the linked elements are excluded from the search results only if they agree on every detail.
- Multiple AGREE items are used to specify, for example, that two elements must not agree in number and must not agree in case.
Greek Example: Using the AGREE Connecting ItemGreek Example: Using the AGREE Connecting Item
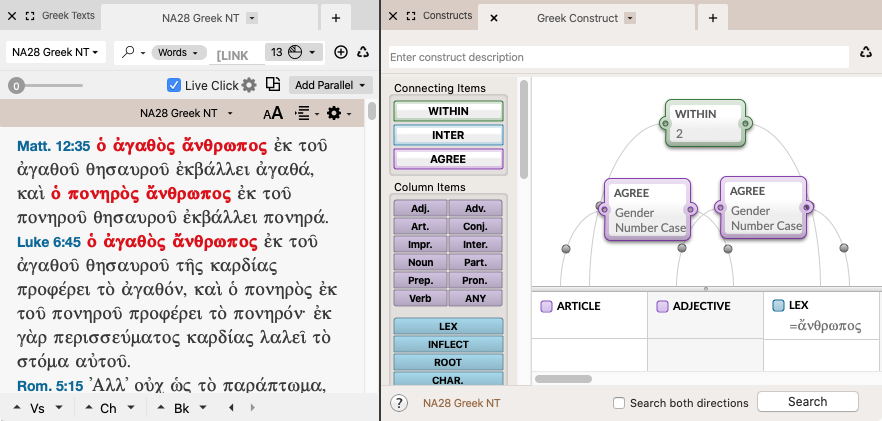
Goal: To find some of the adjectives that modify ανθρωπος (man) in the Greek New Testament. You want to look for an article, followed by an adjective, followed by a form of ανθρωπος where all three agree in gender, number, and case.
- Drag the Art. item into the first column. The Tag details dialog box appears.
- Click OK in the Tag details dialog box to close it without adding any details.
- Drag the Adj. item into the second column. The Tag details dialog box appears.
- Click OK in the Tag details dialog box to close it without adding any details.
- Drag the LEX item into the third column and enter ανθρωπος.
- To specify that the elements of the construct must agree in gender, number, and case, proceed as follows:
- Drag an AGREE connecting item over the first and second columns. The Select agreement details dialog box appears.
- In the Select agreement details dialog box, choose Gender, Number, and Case, and click OK.
- Press down on Opt+ and drag the AGREE item over the second and third columns. This creates a duplicate of the AGREE item.
- Drag a WITHIN connecting item into the Connecting area. The Set limit for word proximity dialog box appears.
- In the first box of this dialog box, type 2 and click OK. This specifies that the elements can be no more than two words apart.
- Drag an arm of the WITHIN item so that it connects the first and last element columns.
- Make sure the Construct tab is linked to the Search tab
 The core tab used to search Bible texts, it consists of a search entry area and a search results area and click OK in either tab.
The Search tab and Greek Construct tab should appear as shown below.
Hebrew Example: Using the AGREE Connecting ItemHebrew Example: Using the AGREE Connecting Item
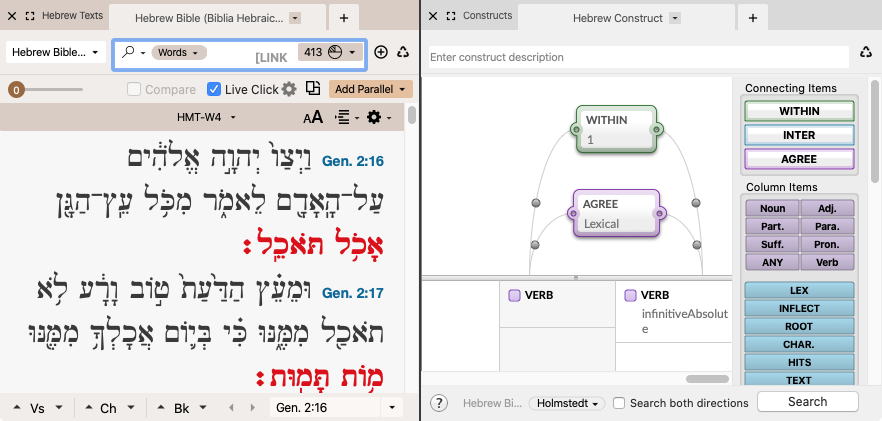
Goal: To search the Hebrew Torah for examples of any infinitive absolute verb followed by another verb from the same root![]() A root is a unit of a language that cannot be further divided, from which words are derived by modification. The root does not necessarily survive as a word in itself. The Accordance roots may combine homographs and therefore a single root may include roots with different etymologies and meanings. In Hebrew, by convention, the lexical form (lemma) of a verb is the same as the root..
A root is a unit of a language that cannot be further divided, from which words are derived by modification. The root does not necessarily survive as a word in itself. The Accordance roots may combine homographs and therefore a single root may include roots with different etymologies and meanings. In Hebrew, by convention, the lexical form (lemma) of a verb is the same as the root..
- In the Search tab, set the Search Range to include Genesis through Deuteronomy.
- Drag the Verb item into the first column. The Tag details dialog box appears.
- In the Tag details dialog box, set the Aspect to infinitiveAbsolute.
- Drag another Verb item into the second column. The Tag details dialog box appears.
- Click OK in the Tag details dialog box to close it without specifying additional details.
- To specify that the elements of the construct must agree in lexical form
 The canonical (dictionary) form of a word, drag the AGREE connecting item above the first two columns. The Select agreement details dialog box appears.
 - In the Select agreement details dialog box, select Lexical form and click OK. The AGREE item appears over the first two columns.
- Drag a WITHIN 1 connecting item over the first two columns. This specifies that the elements must be adjacent.
- Make sure the Construct tab is linked to the Search tab and click OK in either tab.
The Search tab and Hebrew Construct tab should appear as shown below.
Using AGREE with Negative ColumnsUsing AGREE with Negative Columns
The AGREE connecting item can be placed between a negative column and its adjacent word.
- Greek: This is useful for easily finding anarthrous noun constructs, such as a search for θεος when it is NOT preceded by an article which agrees with it (see example below).
- Hebrew: This is useful for easily finding specific constructs such as a search for a verb when it is NOT preceded by a pronoun which agrees with it (see example below).
Greek Example: AGREE with Negative ColumnsGreek Example: AGREE with Negative Columns
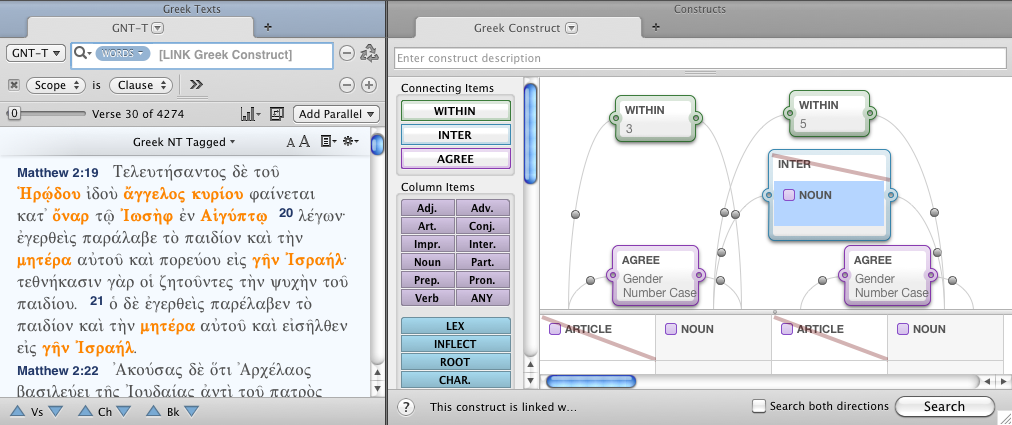
Goal: To find instances where two anarthrous nouns are used together.
- In the Search tab, click the Search Conditions button (
 ), choose the Scope field, and set the Scope to Clause from the Scope pop-up menu.
 - In the Greek Construct tab, drag an Art. (Article) element into the first column. The Tag details dialog box appears.
- Click OK in the Tag details dialog box to close it without adding any details.
- Drag a NOT item over the Article element.
- Drag a Noun element into the second column. The Tag details dialog box appears.
- Click OK in the Tag details dialog box to close it without adding any details.
- Press down on Opt+ and drag the Article element into the third column. This copies the element into the column.
- Press down on Opt+ and drag the Noun element into the fourth column.
- Drag an AGREE connecting item over the first and second column. The Select agreement details dialog box appears.
- In the Select agreement details dialog box, choose Gender, Number, and Case, and click OK.
- Press down on Opt+ and drag the AGREE item over the third and fourth columns.
- Drag a WITHIN 3 connecting item between the first article and noun (first and second columns).
- Drag a WITHIN 5 connecting item between the two nouns (second and fourth columns).
- Drag an INTER connecting item between the two nouns (second and fourth columns).
- Drag a NOUN element into the INTER item.
- Drag a NOT item onto the INTER item.
This construct finds any two anarthrous nouns with no intervening noun. The Construct and results are shown below.

Hebrew Example: AGREE with Negative ColumnsHebrew Example: AGREE with Negative Columns
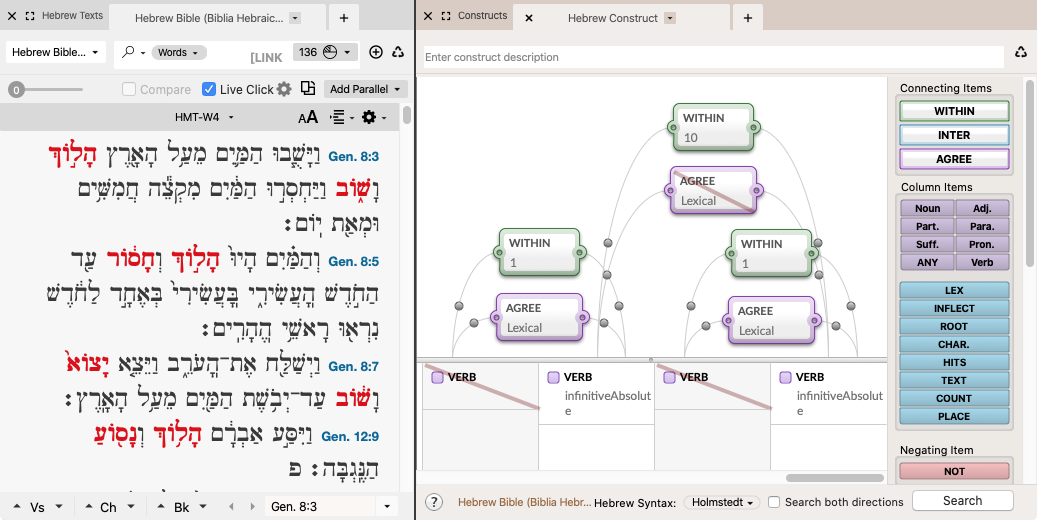
Goal: To study multiple occurrences of the infinitive absolute where they are not followed by the same lexical form in a different aspect.
- Drag a Verb element into the first column. The Tag details dialog box appears.
- In the Tag details dialog box, set the Aspect to infinitiveAbsolute.
- Press down on Opt+ and drag this Verb element into the third column. This places a copy of the element in the third column.
- Drag a Verb element into the second column. The Tag details dialog box appears.
- Click OK in the Tag details dialog box to close it without adding any details.
- Drag a NOT item over the Verb element in the second column.
- Press down on Opt+ and drag this Verb element into the fourth column.
- Drag an AGREE connecting item between the first and second columns. The Select agreement details dialog box appears.
- In the Select agreement details dialog box, choose Lexical form and click OK.
- Press down on Opt+ and drag this AGREE item over the third and fourth columns.
- Press down on Opt+ and drag this AGREE item over the first and third columns.
- Drag a NOT item over the AGREE item between the first and third columns.
- Drag a WITHIN 10 connecting item between the first and third columns.
- Drag a WITHIN 1 connecting item over the first and second columns.
- Press down on Opt+ and drag this WITHIN item over the third and fourth columns.
The Construct and Search tabs are shown below.
