Highlighting and Symbols
You can apply color highlighting or symbols to entire verses in Texts, and single words in Texts or Tools. Word highlights appear only in the module in which they were applied. Highlights are defined in a predefined file (My Mobile Highlights), installed with the application. You can also create new highlights and edit existing ones. If desired you can use the highlight file from the desktop version of Accordance. You can also sync highlights between your computer and mobile device. All these procedures are detailed below.
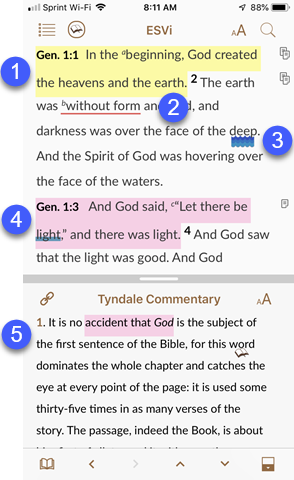
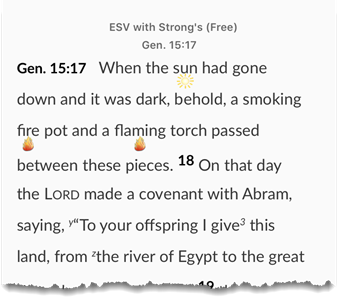
Accordance also provides several Highlight symbols, designed specifically for marking up text as used in Precepts Bible Studies. These can be used to mark words and verses in Texts and Tools.
- Highlighted verse
- Highlighted selection (one word)
- Highlight symbol applied to a word
- A highlight color applied to the verse with a highlight style applied to a selection.
- Highlighted selection and a symbol applied to content in a Tool module.

- Tap and hold on a verse reference in the Main View. The Action menu appears.
- To apply a highlight style to more than one verse, tap the left or right arrows above the Action menu. The selected verses are displayed.
- Tap Highlight Verse(s). The available highlight styles and symbols for the default Highlights file are displayed.
- Do one of the following:
- Tap Recents to select a recently used Highlight or symbol.
- Tap Styles to select a Highlight style.
-
Tap Symbols to select a symbol.
The highlight or symbol is applied to the selected verse(s) in every installed Text translation or version.
- Select and hold on the selection be highlighted. The Action menu appears.
- Tap Highlight on the Action menu. The available highlights and symbols for the default Highlights file are displayed.
- Do one of the following:
- Tap Recents to select a recently used Highlight or symbol.
- Tap Styles to select a Highlight style.
-
Tap Symbols to select a symbol.
If the selection spans part of more than one verse, the style or symbol is applied to the selected verse(s) in every installed Text translation or version. If the selection is limited to part of a verse, the highlight style or symbol will only be applied to the currently-used translation.
- Tap and hold the Active Highlighting button (
 ) on the Main View toolbar. Active Highlighting is turned on, indicated by a blue border surrounding the button (
).
- If a different highlight style is desired, tap the Active Highlighting button to display a menu of recently used highlight styles.
- Tap and hold on a word, then drag to the desired location. The Highlight palette is displayed. You can choose to accept the highlighted selection or change the highlight style.
- To accept the highlighted selection, tap anywhere on the screen. The Highlight palette closes.
- To change the highlight style, select a recently used highlight style from the Highlight palette or tap the Extra Items button (show button) and select a different highlight style or symbol from the display.
- You can also do any of the following when the Highlight palette is displayed:
- Tap Recents to select a recently used Highlight or symbol.
- Tap Styles to select a Highlight style.
-
Tap Symbols to select a symbol.
If the selection spans part of more than one verse, the style or symbol is applied to the selected verse(s) in every installed Text translation or version. If the selection is limited to part of a verse, the highlight style or symbol will only be applied to the currently-used translation.
You can create new highlights on your iOS device. To create a Highlight:
- Bring up the Action menu by tapping on a word in a Text or Tool.
- Tap Highlight on the Action menu. The Highlights pop-up is displayed.
- Tap Edit on the Highlights pop-up. The Edit Highlight Styles pop-up is displayed.
- Tap the Plus button (
) to display the Edit Style pop-up.
- Tap Name to add a name for the highlight style.
- Tap Color to select a predefined color, or to create a custom color.
- Slide the Intensity slider to increase or decrease the contrast.
- Tap Shape to select the highlight shape.
- Tap Pattern to select the highlight pattern.
-
Tap Save to save the highlight style.

You can edit Highlight styles on your iOS device. To edit a Highlight:
- Bring up the Action menu by tapping on a word in a Text or Tool.
- Tap Highlight on the Action menu. The Highlights pop-up is displayed.
- Tap Edit on the Highlights pop-up. The Edit Highlight Styles pop-up is displayed.
- Tap the style to be edited to display the Edit Style pop-up.
- Tap Name to add a name for the highlight style.
- Tap Color to select a predefined color, or to create a custom color.
- Slide the Intensity slider to increase or decrease the contrast.
- Tap Shape to select the highlight shape.
- Tap Pattern to select the highlight pattern.
-
Tap Save to save the highlight style.

You can delete Highlight styles on your iOS device. To delete a Highlight:
- Bring up the Action menu by tapping on a word in a Text or Tool.
- Tap Highlight on the Action menu. The Highlights pop-up is displayed.
- Tap Edit on the Highlights pop-up. The Edit Highlight Styles pop-up is displayed.
- Tap Edit. The delete icons (
) are displayed to the left of the Highlight style.
- Tap the delete icon (
) to the left of the Highlight style to be deleted. The Delete button is displayed.
- Tap Delete. The Highlight style is deleted.
- Tap Done to save the changes.

You can arrange the order of Highlight styles on your iOS device. To order Highlight styles:
- Bring up the Action menu by tapping on a word in a Text or Tool.
- Tap Highlight on the Action menu. The Highlights pop-up is displayed.
- Tap Edit on the Highlights pop-up. The Edit Highlight Styles pop-up is displayed.
- Tap Edit. The list buttons (
) are displayed to the right of the Highlight styles.
- Sliding the list button (
), place the Highlights in the desired order.
- Tap Done to save the changes.

You can create new sets of highlight files on Mac or Windows. This enables defining a large variety of styles for each highlight file, and applying the highlights to entire verses or individual words or phrases.
The Sync feature brings all selected Highlight files up to date on both devices, and merges any changes made, whether on Mac or a device ( iPad®, iPhone®, or iPod touch®).
After syncing the highlight files between your Mac or Windows computer and mobile device, you can select which default Highlight file to use via the Settings or by simply tapping the name of the current Highlights file and selecting a different one.
To change the default Highlights file via the Library:
- Tap the Library button (
 )>Settings button (
 ), then tap Highlights File. A list of Installed Highlight Files is displayed.
 -
Tap the desired Highlight File.
The new Highlights file displays the word and verse highlights and symbols wherever they have been applied in your current Texts or Tools. You can also use any of the defined styles in that file to highlight additional verses.
You can search for a specific highlight by adding the STYLE command in the Search Entry box.
- Open Search View.
- In the Search Entry box, add the STYLE command. The command [STYLE *] is added.
- The asterisk (*) will find all highlights. Replace the asterisk with a specific Style name to limit the Search to just that highlight.
- Combine this command with other search criteria to find a specifically highlighted word. For example: [STYLE *] <AND> Moses in the Search Entry box will find any verses with the word Moses and some highlighting.

