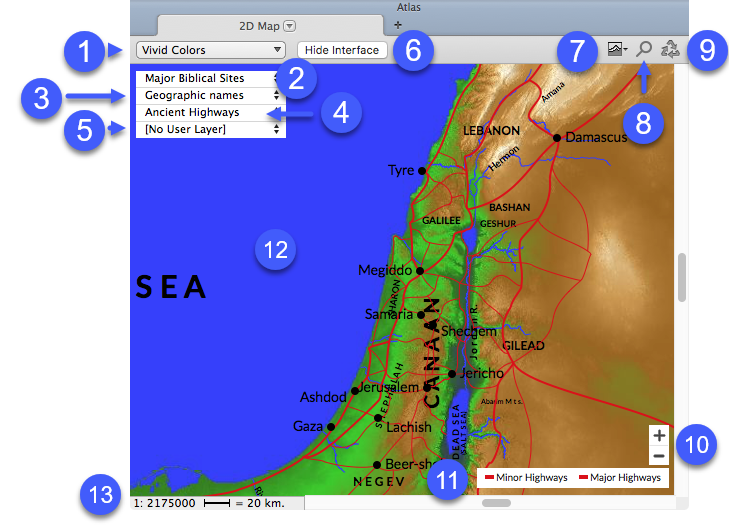
Overview of the 2D Atlas Tab
Atlas maps can be opened via the Library, the Toolbar, or the Menu bar. All Atlas maps are usually displayed in their own zone in a Atlas tab. You can change the view of the map, customize it, add and remove layers, all from the Atlas tab.
Refer to the table beneath the picture for details.

| No. | Item | Description |
|---|---|---|
| 1 | Background Pop-up Menu | Displays a list of different backgrounds for the map. Select No Background to view a map over a plain white background |
| 2 | Site Layers Pop-up Menu | Displays a list of site layers that can be added to the map |
| 3 | Route Layers Pop-up Menu | Displays a list of route layers that can be added to the map |
| 4 | Region Layers Pop-up Menu | Displays a list of region layers that can be added to the map |
| 5 | User Layers Pop-up Menu | Displays a list of layers that you created, which can be added to the map; the Bible Atlas comes with a few sample User Layers |
| 6 | Hide Interface Button | Shows/Hides interface overlays covering the 2D Atlas Tab |
| 7 | 3D Map Button | Opens a 3D map of the selected area on the map. |
| 8 | Find Button | Opens the Find Name on Map dialog box for locating a name on the Timeline |
| 9 | Recycle Button | Turns blue when the displayed map is recyclable |
| 10 | Zoom Button | Used to zoom in or out of the Timeline area |
| 11 | Legend | Displays a legend of graphical elements on the map |
| 12 | Map Pane | Displays the map with up to four additional layers |
| 13 | Scale | Displays the scale of the map |