Define Region Layers Dialog Box
Prerequisites for use: An Atlas map is the active![]() The application, window, tab, or other screen element which is currently being used; sometimes called the "front" or "frontmost" screen element tab.
The application, window, tab, or other screen element which is currently being used; sometimes called the "front" or "frontmost" screen element tab.
Use: The Define Region Layers dialog box is used to edit or create new Region layers and define their display characteristics.
Description: This dialog box has an upper area used to create or edit the Region layers. The Set region details area is used to further define the display region and subregions.
- Open a map and make it the active tab.
- From the Regions pop-up menu, choose Define Region Layers.
- Open the Define Region Layers dialog box.
- Click New to create a new Region layer. [New name] is added to the List of Region Layers and the Name box.
To edit the layer, select it from the left list of Region layers. - Enter a name for the custom layer in the Name box.
- In the Region Drawing area, choose how the region should be displayed.
- Select the desired region from the Select Region» list.
- In the Set Region Details area, choose the primary region to display and click Select Region».
- From the Subregion pop-up menu (Details for subregion), select each available subregion and define how you want it to appear on the layer.
- Click OK. If a Atlas tab is the active tab, the Region layer is displayed on the map.
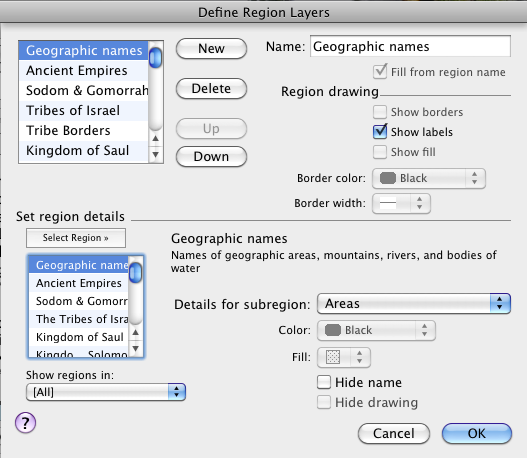
List of Region Layers (Top Left): Displays any Region layers already defined. The layer last used when this dialog box was closed is selected when the dialog box is reopened. Click a layer name to display its current settings in the dialog box.
List Buttons: Used to arrange the layer names in the list and on the pop-up menu.
- New: Adds [New name] to the list and in the Name box, and resets the rest of the options to the default settings.
- Delete: Removes the selected name and definition from the list and from the Region Layers pop-up menu.
- Up and Down Buttons: Click to move the selected name up or down the list.
Name Box: Used to enter or modify the name of the selected layer. Adding spaces before the name indents it on the pop-up menu.
Fill from region name: This item is available only when creating a new Region layer. If selected, the name of the region selected from the Select Region» list (at the bottom of the dialog box) is automatically entered in place of [New name]. Otherwise, replace the text [New name] with a name of your choice.
Region drawing area: Items in this area set the display of all subregions in the layer.
- Show borders: When selected, displays region borders.
- Show labels: When selected, displays region labels.
-
Show fill: When selected, fills each region with a transparent color.
If the layer (such as Geographic names) does not include drawings, the items which apply to borders and fill are dimmed.
- Border color: Defines the color for all borders.
- Border width: Defines the width for all borders.
Set region details area: Options in this area specify which region map is displayed in the layer and the appearance of subregions.
- Select Region» List: Lists all region maps defined in the database.
-
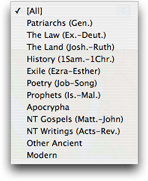
 Show regions in: Opens the Period pop-up menu listing all Biblical or Archaeological periods. Choosing an item limits the regions in the Select Region» list to those which appear in that period.
|
|
Note Simply selecting the name of a region does not change the current layer. You must double-click the name, or select it and click the Select Region» button to change the region in the currently selected layer. |
- The open text area under the divider bar in this dialog box describes the region currently included in the layer selected in the List of Region Layers.
- Details for subregion: Opens the Subregion pop-up menu listing all subregions in the selected region. For each subregion available in the pop-up menu, you can set the fill pattern and color, and choose whether or not to show the name or the drawing. This lets you display the specific subregions that you want.
The pop-up menu is dimmed if only one subregion is available. - Color: Choose the fill color for the selected subregion.
- Fill: Choose the fill pattern (blank, solid, or a variety of lines or dots) for the selected subregion.
- Hide name: Hides the name of the subregion.
- Hide drawing: Hides the outline and fill for that subregion.
If the region has no subregions, the Subregion pop-up menu and the Hide items are dimmed.
|
|
Note If both name and drawing are hidden, the selected subregion is not displayed on the Region layer. |
Example: If you only want to include the names of rivers and oceans on the Geographic names layer, hide the names of the mountains and areas for that layer.

